Exchange Server 2010 allows users to use a web
browser to access their email through an interface called Outlook Web
App (OWA). While this capability existed in Exchange Server 2007 as
well, significant enhancements have been made in the Exchange Server
2010 version. Some of these enhancements are
Redesigned user interface
The fact that browsers other than Internet Explorer can use the Premium functionality in OWA
Email conversation view
Integrated chat capabilities with Office Communications Server
Seamless browser redirection when users connect to the wrong OWA URL
From a management standpoint,
we'll look at what it takes to configure OWA for production environments
and how to enable some of the features offered by the web-based email
client. There are three management tools that you will use when working
with OWA:
Exchange Management Console
Exchange Management Shell
Internet Information Services (IIS) Manager
1. Configure OWA Connectivity
OWA is enabled by default on
Client Access servers. Although OWA is usable in its default
configuration, there are probably some changes you will want to make to
optimize the way you use OWA.
1.1. Configure OWA URLs
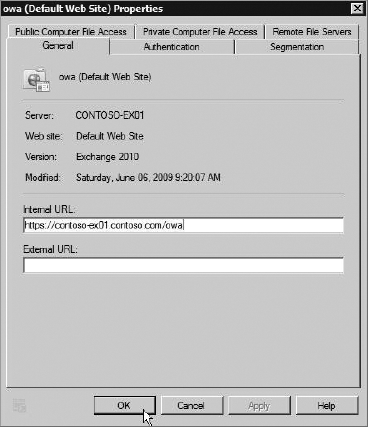
Some services on a CAS use the
concept of internal and external URLs. When Exchange is installed, the
internal URL is automatically populated using the name of the server.
During setup you are prompted to decide if the CAS is exposed to the
Internet. If you choose not to make the CAS Internet-facing, the
external URL is kept blank (Figure 1).
The external URL is used for
redirecting the client to a server in the same site as the user's
mailbox. Here's an example of how that works:
The CAS in Seattle queries AD and determines that the user's mailbox is in Baltimore.
The Seattle CAS finds a CAS that is located in Baltimore and retrieves the external URL for OWA on that CAS.
If the Baltimore CAS does
not have an external URL defined, the Seattle CAS will proxy connections
to the Baltimore CAS instead of redirecting the user to another URL. In
this case, the user remains connected to the Seattle CAS and the
Seattle CAS accesses the Baltimore CAS on behalf of the user.
1.1.1. Set the Same External Name for All Services on a Client Access Server
In Exchange Server 2010, there
are multiple ways to configure the URLs for OWA and other client
services. If you want to set the same external DNS name for all of the
services on a particular CAS, the Configure External Client Access
Domain interface can be used. You do not need to perform this process if
you chose to expose the CAS to the Internet when you installed
Exchange.
Following this process sets
the external URLs for OWA, ActiveSync, the Offline Address Book,
Exchange Web Services, and the Exchange Control Panel.
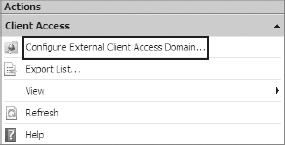
Open the Exchange Management Console and browse to the Server Configuration => Client Access node in the Console tree.
In the Actions pane on the right, click the Configure External Client Access Domain option, as shown in Figure 2.
In
the Configure External Client Access Domain interface, enter the
external DNS name of the CAS in the text box. In the list box, use the
Add button to add Client Access servers that will be configured to use
this external DNS name. This is demonstrated in Figure 3.
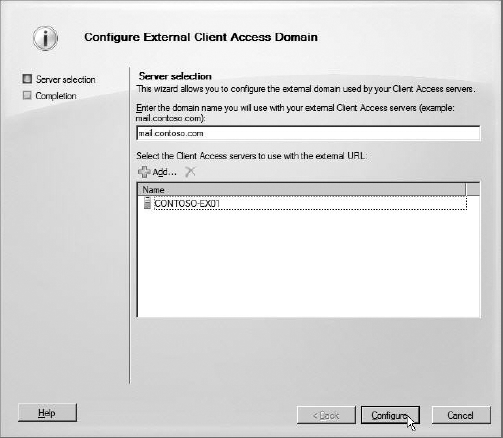
Click the Configure button to set the external URLs on all of the Client Access Servers in the list.
You
may receive a warning notification when configuring the OWA URLs,
indicating that you should ensure that the ECP URL has the same domain
name. The ECP should also be automatically configured during this
process, but to ensure that everything is working properly, do not
change the ECP URL domain name to something different from the OWA URL
domain name.
1.1.2. Configure an External URL on OWA Manually
Aside from using the
configuration dialog box to configure the external URLs for all of the
virtual directories, you can set independent external URLs manually for
each of the virtual directories. The only exception to this capability
is that the OWA URL and the ECP URL should have the same domain name
associated with them.
To manually set the external URL for OWA using the EMC:
Open the EMC and browse to the Server Configuration => Client Access node in the Console tree.
In the Results pane in the middle, select the Client Access Server that you want to set the external URL on.
In
the Work area beneath the Results pane, select the Outlook Web App tab
and click on the OWA website. In the Actions pane on the right, click
the Properties option for the OWA website that you selected.
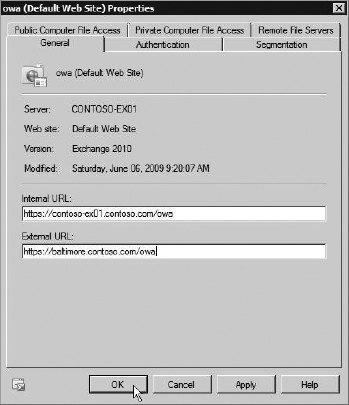
In
the OWA Properties dialog box, ensure that you are on the General tab.
In the External URL box, type the full URL that users outside the
network will use to access OWA and click OK (see Figure 4).
Aside from using the EMC, you can also configure the default OWA URL using the EMS:
Open the Exchange Management Shell.
Use the Set-OWAVirtualDirectory command with the ExternalURL parameter to configure the external URL:
Set-OWAVirtualDirectory
"CONTOSO-EX01\owa (Default Web Site)"
-ExternalURL "https://baltimore.contoso.com/owa"
Use the Set-ECPVirtualDirectory
command to set the external URL on the Exchange Control Panel virtual
directory as well. As with the OWA command, you will use the ExternalURL parameter to specify the URL.
Set-ECPVirtualDirectory -Identity
"CONTOSO-EX01\ecp (Default Web Site)"
-ExternalURL "https://baltimore.contoso.com/ecp"
1.1.3. Configure the Exchange Control Panel External URL
The ECP is the user
configuration interface that is used in conjunction with OWA. When you
configure OWA with an external URL, you also want to ensure that the
external URL is configured for the ECP, so users can access it when they
click the Options button from OWA.
To configure the ECP using the Exchange Management Console:
Open the EMC and browse to the Server Configuration => Client Access node in the Console tree.
In the Results pane, select the Client Access server that you want to modify the ECP external URL for.
In the Work area for the CAS that you selected, select the Exchange Control Panel tab.
Select the ECP virtual directory and choose Properties from the Actions pane on the right.
In
the properties dialog box for the ECP virtual directory, enter the
external URL that you want to use into the External URL box and click
OK. Ensure that you use the /ecp virtual directory instead of the /owa virtual directory that you used previously. For example, the URL might be https://baltimore.contoso.com/ecp.
1.2. Redirect the Default Server URL to OWA
To access web mail, users
will type the URL to the Client Access server into their browser. By
default, the URL that is set up for OWA is https://<FQDN of CAS>/owa. If a user browses to https://contoso-ex01.contoso.com without the /owa
at the end of the URL, they will see the default IIS 7 website. Also,
SSL is required on OWA by default, so if a user browses to the nonsecure
site, http://contoso-ex01.contoso.com/owa, they are met with an Access Denied error.
By customizing the OWA URLs, we'll do the following things:
|
By default, when a Client
Access server is installed, it uses a self-signed certificate to secure
communications for its virtual directories. Unless this self-signed
certificate is trusted by the client workstations, users will receive a
warning when accessing OWA. The correct way to resolve this is to
install a certificate on your CAS that is issued by a certificate
authority (CA) that is trusted by your clients.
|
|
To ensure that users are redirected to the correct location if they don't type /owa
at the end of the URL, you will configure the default IIS site with an
HTTP redirection. Follow these steps on the Client Access server to
configure this redirection:
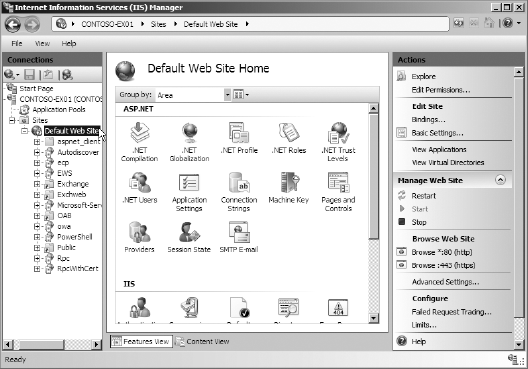
Open the IIS Manager tool by clicking Start => All Programs => Administrative Tools => Internet Information Services (IIS) Manager.
When IIS Manager opens, browse to the Default Web Site node in the Console tree, as shown in Figure 5.
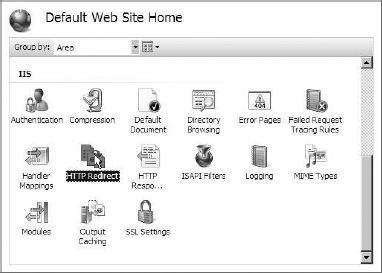
In the Work area, double-click the HTTP Redirect icon in the IIS section, as shown in Figure 6.
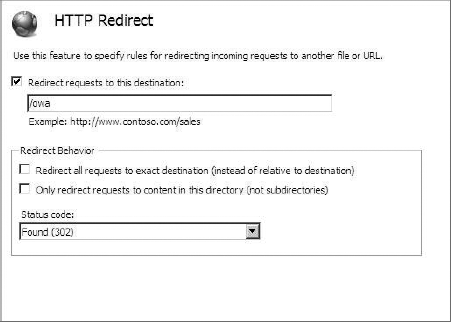
When the HTTP Redirect options are displayed, check Redirect Requests To This Destination. For the destination, enter /owa.
Using only the /owa
location will ensure that the URL is redirected appropriately
regardless of whether the user is accessing OWA from an internal URL or
an external URL. Figure 7 demonstrates the configuration of the HTTP Redirect options.
Click the Apply button in the Actions pane on the right to apply the HTTP Redirect configuration change.
|
When you set the HTTP Redirect
at the root in the default website, the HTTP Redirect settings will be
inherited by every virtual directory and application beneath it.
Therefore, you will need to remove the HTTP Redirect settings for OWA
from each of these virtual directories and applications individually.
|
|
You
must now remove the inherited HTTP Redirect settings from each site
under the default website. Repeat steps 2–5 for each virtual directory
and application beneath the default website. However, in step 4, be sure
to uncheck the
option Redirect Requests To This Destination. This option should not be
configured for anything other than the default website. Remember to
click Apply (step 5) after configuring each virtual directory. At a
minimum, this setting should be removed for the following virtual
directories and applications:
1.3. Redirect from HTTP to HTTPS
In addition to
redirecting users from the default website to the OWA virtual directory,
you should also set up a redirection from the nonsecure HTTP URL to the
SSL-enabled HTTPS URL. To do this, you will create a custom error for
when a user accesses the URL without SSL. This custom error will
redirect the user to the HTTPS OWA URL instead of displaying an error
page. To configure this, you will need to use the IIS Manager tool on
the Client Access server.
Open IIS Manager by clicking Start => All Programs => Administrative Tools => Internet Information Services (IIS) Manager.
In the IIS Manager tool, browse to the Default Web Site node in the Console tree.
In the Work area, double-click on the Error Pages icon in the IIS menu to bring up the list of custom error pages.
In the Actions pane, click the Add button to add a new custom error page.
This will launch the Add Custom Error Page dialog box.
In the Add Custom Error Page dialog box, enter 403.4 in the Status Code field.
In
the Response Action box, click the option Respond With A 302 Redirect.
In the absolute URL field, enter the full HTTPS URL to OWA. For example,
this could be https://mail.contoso.com/owa.
Click OK to make the changes and close the dialog box.